Monday, February 14, 2022

ADOP Error: UNEXPECTED]You must run adop from the primary node

 Issue

Recently, EBS Dev instance has been cloned from production. Clone got completed successfully and application is running fine. This is multi node clone with DEV having 2 application tiers. But fs_clone command failed with below errors.


[applmgr@ebsdevapp01 ~]$ adop phase=fs_clone

ERROR: This env should be sourced from ebsdevapp01 !


Enter the APPS password:

Enter the SYSTEM password:

Enter the WLSADMIN password:


Validating credentials.


Initializing.

Run Edition context : /appsr12/R122/fs2/inst/apps/EBSDEV_ebsdevapp01/appl/admin/EBSDEV_ebsdevapp01.xml

Patch edition context: /appsr12/R122/fs1/inst/apps/EBSDEV_ebsdevapp01/appl/admin/EBSDEV_ebsdevapp01.xml

Patch file system free space: 226.11 GB


Validating system setup.

Node registry is valid.

[UNEXPECTED]You must run adop from the primary node -> ebsdevapp02


Cause & Fix

As part of  cloning, addnode command is executed on primary node instead of actual target server that needs to be added. 


Due to this, the addnode.pl has updated the /u01/ebsdev/fs1/FMW_Home/Oracle_EBS-app1/applications/oacore/APP-INF/node_info.txt for primary node with information pointing to secondary node as below.


ebsdevapp01:CONTEXTFILE=/appsr12/R122/fs1/inst/apps/EBSDEV_ebsdevapp02/appl/admin/EBSDEV_ebsdevapp02.xml

ebsdevapp01:INSTANCETOP=/appsr12/R122/fs1/inst/apps/EBSDEV_ebsdevapp02

ebsdevapp01:ORACLEHOME=/appsr12/R122/fs1/EBSapps/10.1.2

ebsdevapp01:FNDSECURE=/appsr12/R122/fs1/inst/apps/EBSDEV_ebsdevapp02/appl/fnd/12.0.0/secure

ebsdevapp01:DBCFILENAME=EBSDEV.dbc

ebsdevapp01:TNSADMIN=/appsr12/R122/fs1/inst/apps/EBSDEV_ebsdevapp02/ora/10.1.2/network/admin


Inorder to fix the issue, we need to manually edit the file node_file.txt to point to correct values

Friday, January 7, 2022

ORA-12547: TNS:lost contact

Issue:

We are doing database upgrade and suddenly when we try to connect to database as sysdba, started seeing ora-12547 error as below:


[oracle@oradb1 19.3.0]$ sqlplus / as sysdba
 
SQL*Plus: Release 19.0.0.0.0 - Production on Fri Jan 7 09:59:41 2022
Version 19.13.0.0.0
 
Copyright (c) 1982, 2021, Oracle. All rights reserved.
ERROR:

ORA-12547: TNS:lost contact


We verified database processes and running fine but still unable to connect to database. Tried connecting as sys or system user and still having same issue.

We are able to connect to database via listener successfully.

Cause:

spfile has been corrupted as it has been accidentally edited by some one. Got below error when tried creating pfile from spfile.

SQL> create pfile from spfile;

create pfile from spfile*

ERROR at line 1:

ORA-01565: error in identifying file '?=/dbs/spfile@.ora'

ORA-27046: file size is not a multiple of logical block size

Additional information: 1


Fix:

Upon further investigation, We identified that spfile has been accidentally edited by someone making the file corrupt.

Performed action plan as below:
1) Connect to database as sys user with TNS
2) shut down  database (if required,  get parameter detaisl from database before shutdown)
3) create pfile/spfile manually from backup
4) Startup database


Wednesday, December 16, 2020

OCI: How to resize Root Disk in OCI for Linux


In general, when you provision a Linux Compute the default size of boot disk will be 47 GB and sometimes this may not sufficient when the server usage keeps increasing. Even though while creating a Compute you have a flexibility of sizing the boot disk, we often miss to set or you may not be sure the initial sizing requirements.

This post will detail the steps on how to resize the root disk in Linux. Good news is that Oracle has provided a simple utility to resize root disk (/) in a simple and safer way.

As part resize first step is to resize Boot Volume in OCI.

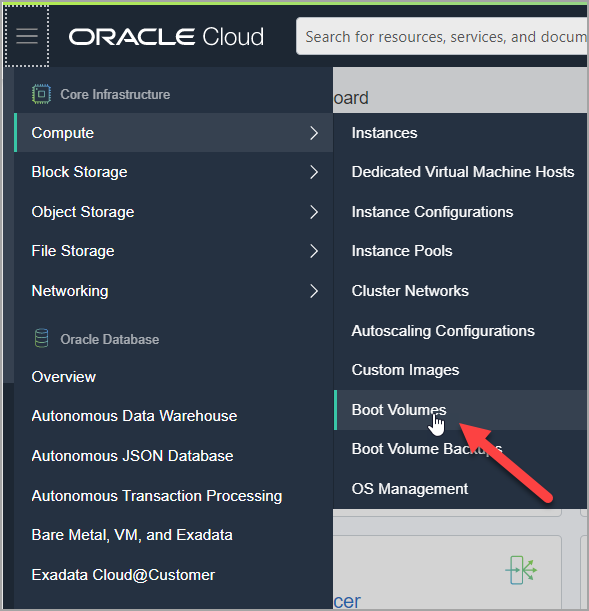
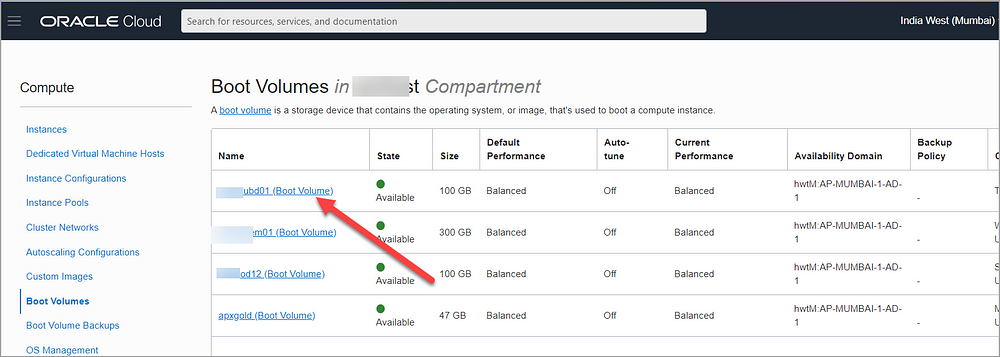
Login to OCI, Open the navigation menu. Under Core Infrastructure, go to Compute and click Boot Volumes.

In the Boot Volumes list, click the boot volume you want to resize.

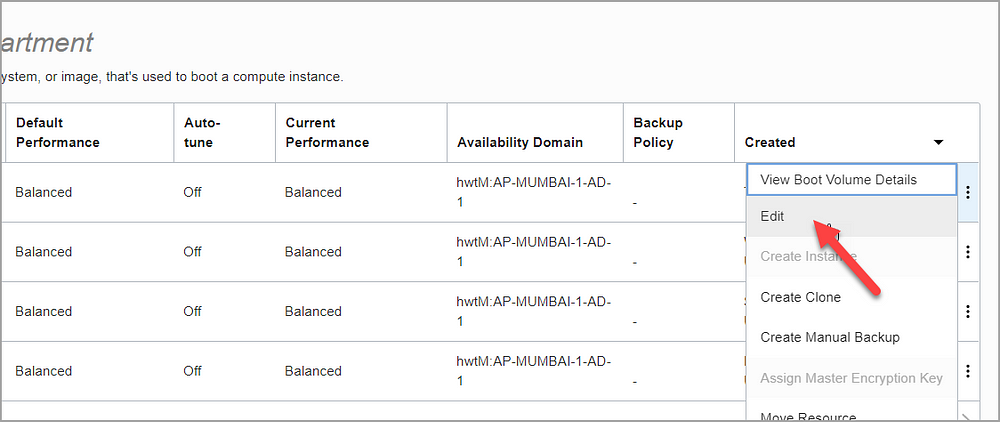
Then choose three dots and click Edit

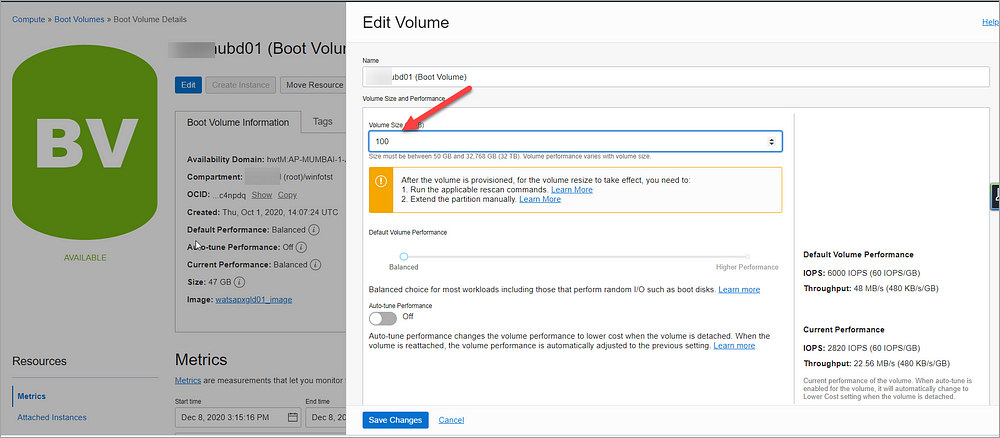
Specify the new size in VOLUME SIZE (IN GB). You must specify a larger value than the boot volume’s current size (for e.g. 100GB)

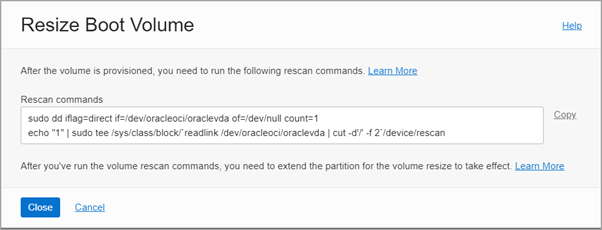
Click Save Changes. This opens a dialog that lists the commands to rescan the disk that you need to run after the volume is provisioned.

You need to run these commands so that the operating system identifies the expanded volume size.

Now the resize of boot volume is completed successfully in OCI. We need to now proceed with steps to be performed Linux box.

Login to Linux VM as root user and run the OCI commands from above step.

# sudo dd iflag=direct if=/dev/oracleoci/oraclevda of=/dev/null count=1
# echo “1” | sudo tee /sys/class/block/`readlink /dev/oracleoci/oraclevda | cut -d’/’ -f 2`/device/rescan
Now the next step is to run the OCI utility oci-growfs command which will resize the / disk.

oci-growfs is available as part of oci-utils rpm for Oracle Linux 7& 8. If the compute is installed from OCI standard image this will be available by default. If the image custom, we need to install oci-utils rpm manually.

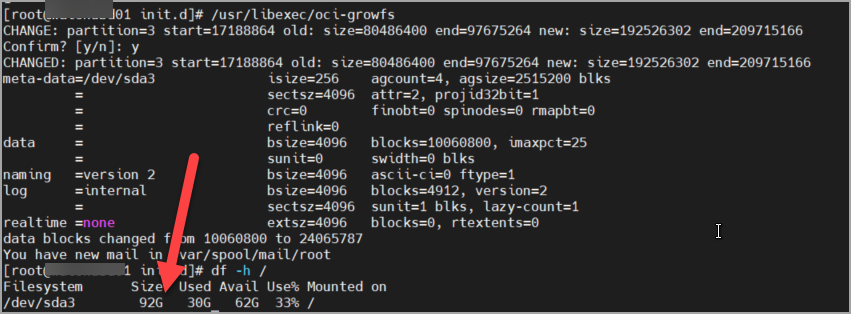
Extend the partition and grow the file system using the oci-growfs as below

# /usr/libexec/oci-growfs

Yoo! Boot disk resize is completed successfully.

Note: This action plan tested and works for Oracle Linux 7.